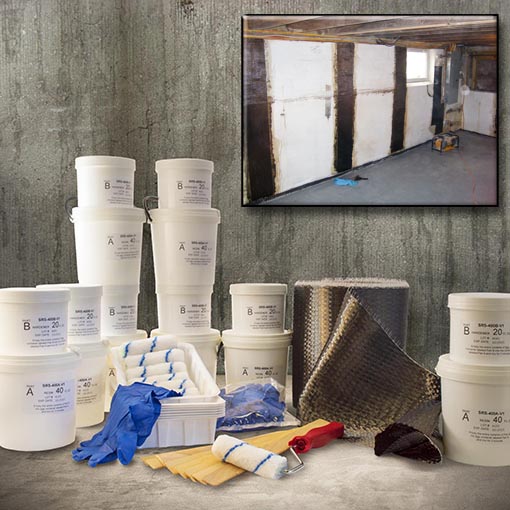
Waterproof your basement to prevent flooding like this! Photo Credit: ThrasherBasements.com
Basements are often a home’s most under-utilized area. They’re dark, don’t have very good ventilation, often have awkward layouts, and exposed pipes, wiring, and other utilities pose ugly and challenging obstacles. But finishing a basement (or just simply waterproofing it) can add valuable area to your home, increasing both your living space and your home’s value.
Leaking basements are both unusable and unhealthy, so basement waterproofing needs to be a top priority for any homeowner looking to re-vamp this space. But where do you start? If you talk to a dozen different people, they’ll probably give a dozen different answers as to how you should waterproof your basement. I’m going to tackle the topic from two angles: what NOT to do, and what TO do. In most cases, basement waterproofing is actually pretty simple…so simple, in fact, that you can do it yourself!
Myths and Misconceptions
Waterproofing companies will probably try to sell you a plethora of expensive equipment and products to waterproof your basement. And in severe cases, these products can be very effective. But before you prepare to cut a really big check, there are a few things that you can do yourself, and a few things to keep in mind.
One of the biggest misconceptions behind basement waterproofing is that the end goal is to seal your foundation so tightly that it will resist any droplet of water. But your home isn’t a boat…unless it’s a houseboat, in which case, you should probably be reading a different article. And since your home isn’t a boat, it doesn’t need to float. Some water is harmless, and depending on your climate, actually necessary to keep your foundation healthy.
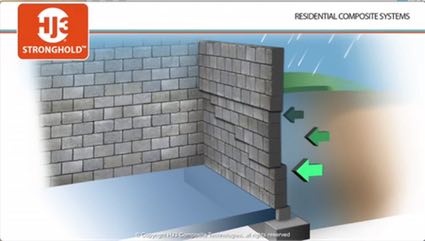
Water can saturate the soil outside your home, which then pushes against your foundation, causing cracks and leaks.
Another widely held belief is that a wet basement is the result of a high water table. But this is completely untrue because homes aren’t built below water tables (if they were, the contractor would have to deal with a horribly muddy mess when pouring your foundation). Likewise, if your basement floods after a heavy storm or significant snowmelt, it’s not because of a rising water table. And this is great news, because the root cause of your problem will be much easier to detect and fix if your basement only floods or leaks after heavy storms.
The fact is that most basement leaks are a result of drainage issues around the outside of your home. As your soil collects and holds water, that moisture can leak in through your walls and floors. Improving your home’s water drainage processes is the first step in properly waterproofing your basement.
First Steps to Take in Waterproofing your Basement:
Without proper drainage gutters, rain falls off your roof and directly onto your foundation. Photo Credit: Hill Country Gutters, Roofing, & Siding
♦ Improve Roof Drainage
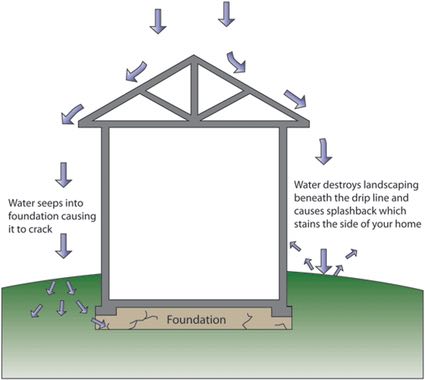
Would you believe me if I told you that improper roof drainage is the number 1 cause of basement leakage? I know that sounds strange…how could the highest point of my house be affecting the lowest point of my house? Well, it’s actually pretty simple:
When it rains or snows, your roof is the first point of contact with that moisture. And when that moisture rolls off of your roof, it collects in the soil directly around your home. Saturated soil can be very heavy and exert a lot of power against your foundation walls, causing them to move out of alignment. When your foundation wall moves, cracks and bowing can occur, which gives water a direct entry into your basement.
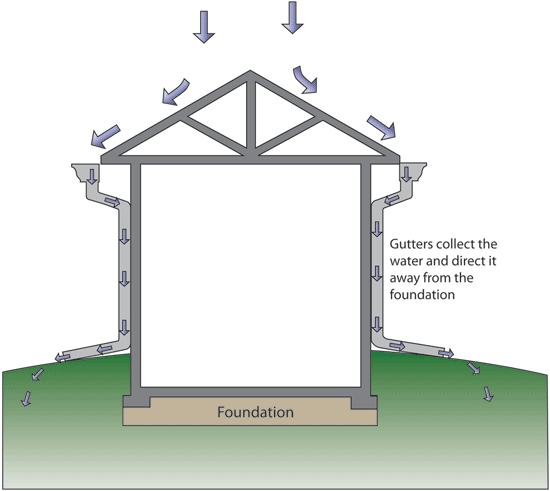
Properly designed rain gutters are the best way to avoid basement leakage due to poor roof drainage.
Seamless rain gutters are perfect for directing water away from your foundation. Photo Credit: Hill Country Gutters, Roofing, & Siding (hcgrs.com)
- You should have at least one downspout for every 600-800 square feet of roof surface
- Make sure that your gutters are clean and clear of debris. Clogged gutters can overflow and drop water directly into the soil around your foundation.
- Extend the ends of your downspouts so that they direct water at least 4 feet away from your home
♦ Slope Your Soil
The angle and type of soil around your foundation play a very important role in keeping your basement dry…or sopping wet.
- Soil should slope AWAY from your home
- Make sure that your soil has a downward slope of at least 6 inches over the first 4 feet from your foundation wall
- After the initial 4-foot space, your soil can slope more gradually if you’d like
- If your soil grading needs improvement, rely on clean fill dirt, not topsoil
- Topsoil is very porous and organic. It both absorbs and holds water very well, which is bad for your foundation.
- Avoid landscaping that keeps soil next to your house
- Landscaped edging around flowerbeds is beautiful, but the edges can prevent water from draining away from your foundation.
Stopping (and Preventing) Leaks…For Good!
Now that you’ve re-directed water away from your house and removed the source of seepage, let’s keep it out for good. Since your walls and floors are the most susceptible to water intrusion, those are the components you’ll want to focus on.
Walls
Before you can prevent future water seepage, you’ll have to stop any existing seepage. As saturated soil pushes against your foundation walls, they can start to bow and crack, providing the perfect invitation for unwanted moisture. Fill all cracks with a crack filling agent – and if they’re leaking, make sure that you use a urethane crack filler to absorb any water.
Unfortunately, just filling the cracks won’t be enough to keep them (or other cracks) from returning, but that’s where StrongHold™’s carbon fiber systems come into play.
- Carbon Fiber Crack Repair Kit: After you’ve filled all the cracks you can find in your basement walls, you’ll want to confine them so that they don’t reappear. StrongHold™’s crack repair kit provides bi-directional carbon fiber fabric that will both confine the cracking AND counteract the forces that try to pull the crack back apart.
- For details about installing StrongHold™’s Cracked Wall Repair Kit, click here.
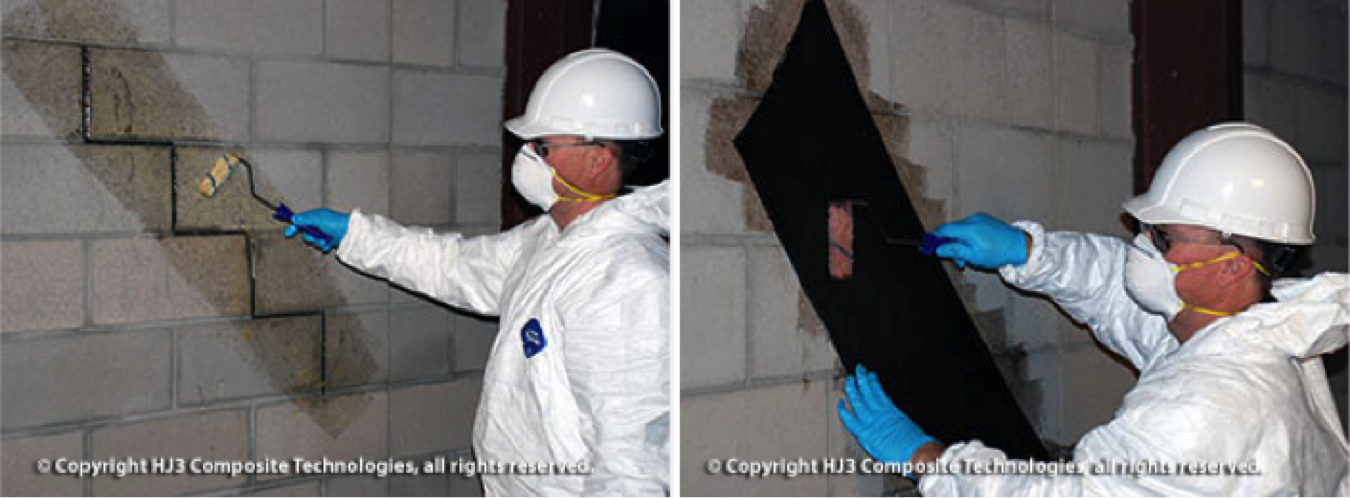
StrongHold’s cracked wall repair kit confines wall cracks, preventing basement leaks.
- Carbon Fiber Bowed Wall Repair Kit: Bowing walls often lead to cracks, so it’s vitally important to stop your wall’s bow in its tracks. StrongHold™’s bowing wall repair kit provides uni-directional carbon fiber fabric straps that effectively stop your wall’s bowing, preventing any cracks from appearing.
- For details about installing StrongHold™’s Bowed Wall Repair Kit, click here.

StrongHold’s bowing wall repair kit stops your wall’s bow in its tracks, preventing cracking and basement leaks.
Floors
Since your floor rests directly on the compacted soil beneath it, it’s especially susceptible to water seepage, mold, and other water-related problems. Fill any and all floor cracks with a crack filling agent, and then confine them with StrongHold™’s revolutionary carbon fiber floor stitch kit.
- Cracks in your basement floor are likely caused by uneven foundation settlement. Therefore, filling your cracks is just a temporary bandaid and doesn’t provide a solution for the underlying problem.
- StrongHold™’s carbon fiber floor stitch kit utilizes pre-cured carbon fiber laminate that, when inserted perpendicular to the crack, reduces concrete’s flexural capacity, confining the cracks and forces that caused them in the first place. For more details about installing StrongHold™’s floor stitch kit, click here.
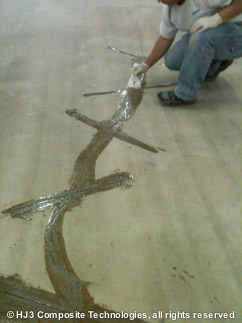
StrongHold’s floor stitch kit works for floor cracks of all sizes!
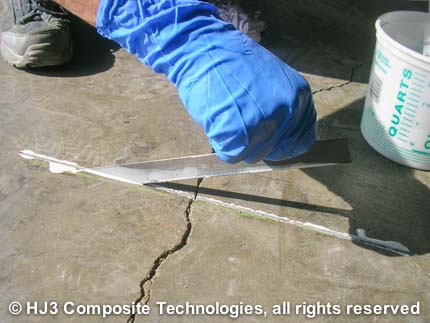
StrongHold’s laminate strips confine concrete cracks to prevent water seepage.
- After filling and confining floor cracks, you can protect your floor by installing waterproof floor tiles.
- Look for heavy-duty polypropylene tiles with tongue-and-groove fitting for the best result.
Want more information about StrongHold™’s carbon fiber kits and how they can help you waterproof your own basement? Write us today at info@hj3.com or call us at 877-303-0453.